Tuesday, September 17, 2013

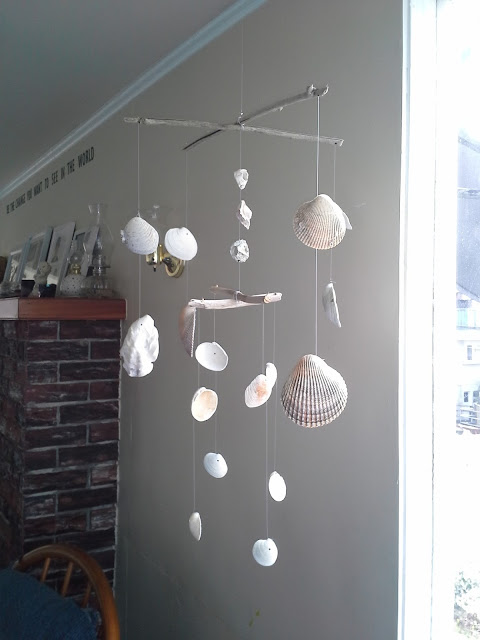
Seashell Mobile


Living in Southeast Alaska, the ocean and all of it's wonders are a big part of life. The beaches here aren't the kind with soft sand and warm waves, these are rugged Alaskan beaches, covered with rocks and barnacles, where the water (even in the summer) is only ever one temperature...COLD! 


Especially since moving to Ketchikan, where the ocean is visible from almost every place in town, the beach has been one of our favorite places to be.

Summer or Winter, in swim shorts or Xtra-Tuffs, the boys love to run around in the surf, searching for creatures and filling their buckets with shells, rocks, and sea glass. 


As you can imagine we've acquired quite the collection  over the years. Last Spring, I finally came across a project that looked like a great way to use up our stock of shells, a seashell mobile!


This turned out so great, the boy's decided they needed some for their room too


Some bright colors and a little glitter made these look
really fun and unique!


This is a super simple, inexpensive craft, especially if you have a beach handy! No worries though, if sea level is far below you, most craft stores have a wide variety of shells to choose from :)

Here's what you'll need:


Drill
Drill bit
Shell assortment
Sticks
Monofilament (or other hanging material)

The first step is to pick which shells you want to use and drill the holes. I found that the smaller bits work better and that breaking a few is inevitable, so pick some of your least favorite for practice.

I used the 3/32 size bit from this set by Master Mechanic


If you are wanting a natural look, skip ahead to the next step, if not, then it's time to decorate!
Grab some paint, glitter, ribbon, rhinestones, anything you have to make your shells look awesome!
The boys also decorated their sticks by coloring them with permanent markers.

Now, if you're making a tiered mobile, you want to tie your sticks together.

I drilled holes in the end of my sticks next, which is optional, depending on how you want to hang your shells. I opted for attaching them with monofilament, small beads, and metal crimps.


If you are tying the shells on, don't worry about drilling the sticks

Once your shells are dry, it's time to string them up!

We went with monofilament for hanging, but yarn, ribbon, floss or string would also work great.


And that's it! A pile of shells has now turned into a beautiful piece of beach art!


Have Fun!!


Friday, March 15, 2013

Felt Board People


When it comes to being inspired, what an age we live in! It seems like everywhere I look, there's a blog, a book, a show, or a website bursting with awesome ideas. I love the feeling of inspiration when a really good idea hits, takes hold, and pretty much takes over until you've found a way to bring it to life. The following craft totally had me in love!


I remember loving felt boards as a kid and if you've read any of my other posts, you know that there's nothing I love more than finding a way to bring that stuff back alive for my boys.
When Kai was about 4, I had gotten a felt board and a few packs of pre-cut packs (letters, numbers, shapes) off Etsy. We used it for awhile, just as an added tool for homeschooling, but there wasn't any of that magic I remembered so well. 
As often happens when hit with the problem of knowing something was awesome, but not quite being able to conjure up a mental picture of it, I turned to Google images. It only took a few pages to find a totally amazing tutorial on Instructables about how to make some awesome  felt board people. 


The dimensions of this board are much bigger than the one I made, but it goes to show that any idea can be customized to work with what you've got.
Click here to view the entire tutorial!

 As I said, the board above is very big, about 4' x 3' and the felt boards I already had were only 20", so I just scaled the people down to a size that would fit.
I will run you through how to make the people, faces, clothes and accessories, but not the board. If you don't already have one available, the link to Instructables above goes through the steps to make your own. You can also just search the web, you'll find instructions on how to make every kind under the sun. 
Now before we start with the people, I did add one thing to my board, a strip of felt grass along the bottom. While not essential, I thought it was a nice touch, feel free to do this first or just move on to the next step.

Here's what you'll need to make your people shapes:

Felt sheets (2 per person)
Marker
Scissors
Permanant Bond Spray Glue

For a good size, you want to cut the body from one sheet of felt and the head from another. To draw my shapes I used a picture of the ones on Instructables for inspiration and drew freehand as well as I could. You can go with totally original shapes also, just make sure that if you're making more than 1, you have the arms and legs in similar positions so all clothes will fit both in the end.

To start, use  a fine tip marker draw to the body as big as will fit on the back of one felt piece.
Next draw the head on the back of the second piece of felt.
Now it's time to cut out and make sure they fit on your board, trim as needed. 
(Take a minute here to lay your body piece on a blank sheet of paper, trace around it, cut out, and set aside. Trust me, this will come in very handy later when making clothes)
Once everything is just the way you want it, lay out newspaper and spray the back of your body shape with glue. Quickly turn over and press onto your board. Repeat steps with the head, sticking it onto the top of the body.
          
If you'll be making another person, go ahead and go through the steps again. Once you've got both your people in place, the next step is making them come to life!


Here's what you need next:


Felt sheets or scraps in assorted colors
Scissors
Black Permanent Marker
Super glue 
Imagination!!

When making eyes, noses, mouths, and hair, let your imagination go wild! Make as many or as few as you wish, but the more variety there is, the more fun it will be later.
Cut your pieces and add details (pupils, teeth, etc.) either by drawing them on with a marker or by gluing smaller pieces of felt on. 


Once you've got your face pieces and hair done, it's time for clothes!


Once again the only limit is your imagination. Using your body template as a guide, start drawing and cutting out shirts, pants, dresses, socks, shoes, anything!! You can glue on small detail pieces if you like, but since felt sticks to itself, anything like a small flower or heart can be made separately, and worn on clothes, in hair, or held in the hand.The more versatile you make things, the more fun the board becomes!

 Now that you've got faces, hair and clothes, the only other thing they need is accessories! 


A baseball bat, a magic wand, a crown, a flower, an umbrella, this is a great way to use some of the scraps leftover from making the clothes and hair. Superglue works fine for smaller details, but I recommend a low-temp. glue gun for any larger detail pieces, like on the umbrella.
I asked for suggestions from the boys for what they would like their people to have and still have a page long list of stuff still to be made. I really love that this is a toy that can be constantly evolving, every time you add something, it opens up new ways to play. 


I had so much fun setting the boards up to take pictures, there are so many fun (and funny!) combinations to put together!

Side Note: When it comes to storage I recommend keeping all the face, hair and accessory pieces (especially the smaller ones) on another felt board if you have one. This makes things everything much easier to see and keep track of. Of course a small plastic bag will always work too!


A small box is perfect for storing clothes in


No matter what you end up with or how detailed you go, the most important thing is to Have Fun!!


See you next week!


Friday, March 8, 2013

Apple Picking Tree


I've always felt such a strong connection to certain things from my childhood, special toys I played with, movies I watched or books I read. There's something so magical about being small and experiencing something for the first time, playing all afternoon and being so completely absorbed in your own little world.

One of my earliest memories is from Kindergarten and playing with this fake blueberry bush they had for Alaska studies week. I could pick the fake blueberries and fill my basket up, then re-attach them and start all over. Who's to say whether this is the reason or not but, to this day, I absolutely love picking berries! Being out in the sun, the birds chirping, surrounded by green, just spending hours filling up my bucket.


When I saw this apple picking tree on the blog I am Momma Hear me Roar, it totally took me back to that place!  I knew I had to figure out a way to make something like this to work in our space.
The version linked is a tree painted onto the wall, which I considered, but it wasn't quite warm enough to open the windows for painting inside and when I want to do a project I have to do it NOW!  


(Click here to see the original tree and the rest of her amazing playroom!)   


Since making our tree I have 
  also thought that one of the removable giant wall sticker trees  like the boys have in their room would work too. I haven't tried it myself, but since the pull on the Velcro isn't very hard, it shouldn't pull the tree away from the wall...I think, if you've tried this and it worked please let me know!
Giant wall decals like the one pictured next to Carter's bed are widely available online.


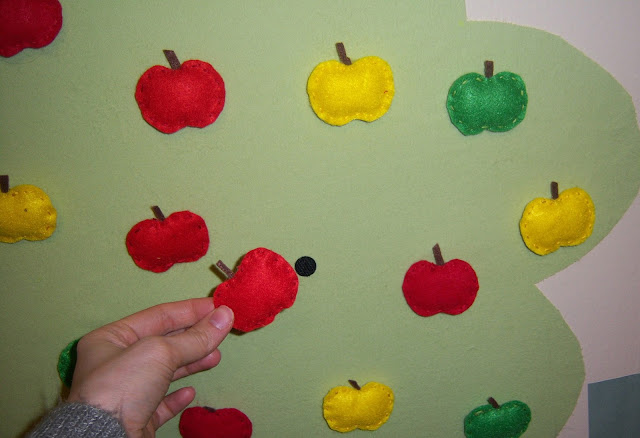
                                     Here is our version of the apple picking tree


It's cut from a big sheet of flannel and stuck to the wall with Elmer's spray adhesive.
I love that it is tactile on so many levels, not only the scratchy Velcro and the fuzzy felt apples, but the tree itself is soft and interesting to the touch.

So I will start with how I made the tree, then move onto the apples. 
Here's what you need for the tree:


Fabric
Spray Adhesive
Marker
Scissors

I went with a basic brown trunk and green leaves, but feel free to use whatever fabric you have, bright pink and blue or orange polka dots or even plaid would be super fun!

Lay out your fabric and use a sharpie to draw your shapes, then cut out.
Find and mark where it will go and prepare an area for spraying the glue, I cover about a 4 ft. space with old newspaper. 
A note before you start spraying the glue, a partner is a BIG help here. I was able to do it myself, but for a permanent bond the material has to be pressed to the wall in less than 15 seconds and with a big piece this is no easy feat. My tree top kept folding over and sticking to itself, I had to reapply adhesive twice and believe me, a few choice words were muttered in the process ;)
Spray your trunk first and quickly press to the wall. Next spray the top and quickly press on the top of the trunk. Allow to set for an hour.

If you will be adding apples to your tree, the next step is to add Velcro dots. You want 1 dot per apple, so figure out how many apples you'll be making beforehand. The felt will only stick to the scratchy Velcro, so only use those dots and save the soft ones for a future project.


Now on to the apples!


I used the apple template from Family Fun that was part of a felt cornucopia craft they came out with a few years ago. Feel free to make your own design if that's your thing, I've attached the link to the templates below though for anyone who is interested. Print and use just the apple on page 3, or go with any other of the fun fruits or vegetables they have, who says you can't have an eggplant tree?
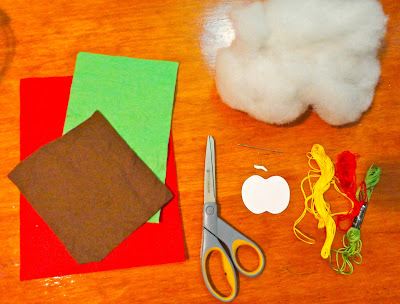
Here's what you'll need for this part:


Felt sheets
Scissors
Embroidery Floss
Needle
Stuffing

Using the template (or cutting freehand), cut 2 sides of felt for each apple and 1 small piece of brown for the stem. Put the sides together with the stem in between and sew along the edges, making sure to put one stitch through the stem to keep it in place. About halfway through, fill with stuffing, then sew closed and tie off. Repeat as many times as needed to get the number of apples you want. I went with twenty apples in red, green and yellow. While it seems like a lot of work, after I'd done the prep, I was able to get all the sewing done in one evening while watching a movie.

And that's it!  Stick them up, find a small basket, and let the kids start picking!


Not only does the tree look super cute, it has also been an awesome learning resource. Carter has been doing preschool at home this year and using the tree has been a fun way to master counting 1-20. Looking forward to next year when we'll start with some apple addition!


    Have Fun!!


Friday, March 1, 2013

Bird Feeders

I don't know about you, but the thought of Spring gets me excited! I know not everyone has winters like we do here in Ketchikan (think lots of dark and wind and RAIN) but when the plants start budding and the flowers start sprouting and the sun starts shining, it makes me want to tap dance down the sidewalk. 


Well, that time is here again!!


 Seemingly overnight the first sign of spring has popped up. We've had such a mild winter that an early spring seems inevitable, yet I've lived here long enough to know that a mild winter can turn on you mid-march and kill everything with a big freeze (fingers crossed this doesn't happen!!) I am choosing to take the optimistic view of things instead and plan as though Spring really is just around the corner. So in the spirit of the new season I thought I'd revisit a fun craft we did a few years ago to help welcome back old friends.


    Bird Feeders!!


One of the best parts of the warming weather is the return of the songbirds around our house. Waking up to sunshine and the sounds of birds chirping is the absolute best start to a day! What better way to make sure they feel at home than to see to it that they are well fed.
I googled "how to make milk carton bird feeder" and as you might expect, got about 10 million results. After looking through the first 4 pages or so, I went with a mash up of different ideas to best use the materials we had.

Materials used for this craft:


Milk Carton (washed and air-dried)
Paint
Paint Brush
Tissue Paper
Exact-O Knife
Foam Sheet
Wooden Dowel/Popsicle stick/Twig
String (for hanging)

Now I've said it before, but I'll say it again, pretty much everything listed (other than the milk carton) is optional, don't let not having the exact same supplies keep you from trying it out. See how we made ours and let it inspire you to dig out what you have and make something awesome!

First step is to use your knife to cut an opening in your carton


Turn over and cut another opening on the other side, remove the cap and push the spout in. When you have something that looks like this...


..it's time to decorate! 

Paint one side at a time, covering the wet paint with tissue 
paper as you go.


When all sides are covered, trim foam sheet to fit (our piece was 4x6") and staple or hot glue to the top of your carton to make the roof.

If you would like to have a perch for added comfort, poke a hole through both sides and run a thin dowel or twig through.


Let dry overnight, then bore a hole in the top (I used my corkscrew :P) and thread some yarn through for hanging. 
Fill the bottom of your feeder with your choice of birdseed find a good place it. 
Finding a spot near a window allows for many good bird watching opportunities, I was so excited the first time I saw a little bird at ours I nearly spilled my coffee.


Now all there is to do is sit back and wait for the birds (and Spring!!) to come.


Have Fun!


A little side note - If you noticed a difference in the boys' appearance it was due to me using pictures taken 2 years apart instead of trying to get all the shots over. Hard to believe how much they've grown!!